Editing is huge part of the art of photography. I've decided I wanted to share with you some of the before-and-afters of my photo editing process so you can see a glimpse of the process. Of course the better the image is captured in-camera, the less editing and 'work' it will need and the best idea is getting it right when you're taking the photo. But...alas, I strive to create a special art product for my clients with my special vision! The work does not stop the moment I walk away from our lovely photo shoot. I get to go to my computer and look at your cute faces, and choose the best of the best and finish creating something you'll hang on your wall to cherish for a lifetime!
Every image I make is carefully and individually edited. Each photo has it's own needs, and it takes a lot of time to give individualized attention to every photo! But this attention is an integral part of the custom photography experience, and my clients deserve the best I can give them. I use a variety of special software, mainly Adobe Photoshop to remove blemishes and background distractions, alter the overall color balance, correct skin tones, remove flyaway hairs, darken or lighten certain areas to draw attention where I want it, create custom black and white images and more.
On to some examples!
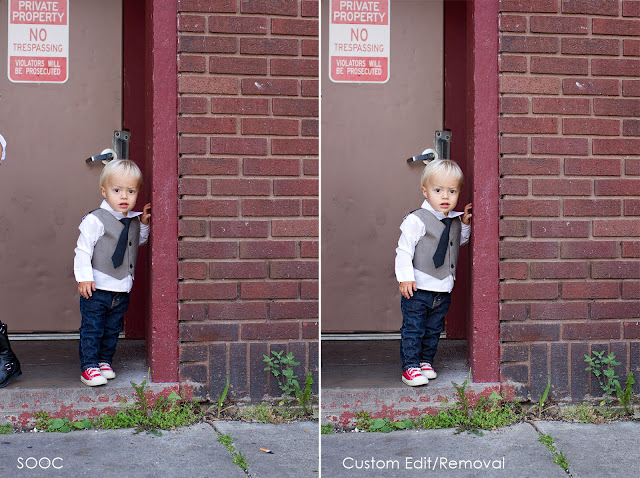
The image on the left is the SOOC, Straight Out Of Camera, shot. Since I'm a 'Lifestyle Photographer' I strive to capture the real moments. I'm not able to say to a 1-year-old, 'hold that pose so I can move this cigaret!" so I just shoot anyways. ;) During my post production editing, I removed the nasty cigaret and some of the dark spots along with the boot on the left side. I also sharpened and made his face stand out a bit, which I like to do with most of the portraits I edit. Below is the edited image plainly desaturated. I like to add some spice and create my own custom B&Ws. Check out the Get Learned post HERE where I talked about Black and White images!
For children photography I like to add a bit of warmth. :) Here I also brightened up his eyes, as the photo was taken on a grey sky day so the light didn't illuminate through completely and the photo was a couple stops underexposed.
In the below images, I wanted to keep that awesome warm glow behind her and illuminating her hair so I had to keep the image a bit dark and underexpose her face. Because I shoot in RAW, which is the highest quality of a digital image, I was able to brighten up her face and eyes and warm the image up while editing in Photoshop. I also removed slight blemishes and smoothed over her face a bit for a lovely polished photo.
Again, I needed to expose for the sunset behind so I popped up the bride and groom a bit to help them stand out! And badda bing, badda boom --> Gorgeous!
And there you have it folks! Editing isn't about dishonesty or being lazy and "not getting it right in the camera." It's about having a vision and creating a masterpiece of art. Editing is a technical skill that helps make you look your absolute best and what makes me an artist! I love editing and seeing those before and afters and seeing how beautiful each person and image is! Thank you for letting me capture YOU! (cuz seriously I love it. :)


